


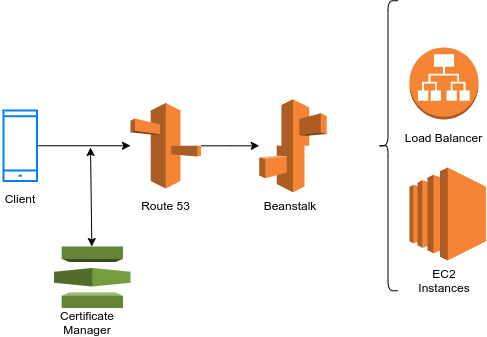
AWS Beanstalk acts as an Infrastructure as a Service (IaaS). We will deploy a node application to the AWS Beanstalk. Then we will ensure the HTTPS connection with Application Load Balancer. To make this work, we will make use of the following AWS services,
- AWS Beanstalk
- Application Load Balancer (From Beanstalk Config)
- Certificate Manager (To get a free SSL Certificate)
- Route 53
Our Architecture will be followings,
To accomplish the goal, we will go with following steps,
- Run the
Node.jsapp in local machine - Deploy the app to
Elastic Beanstalk - Get a free
SSLcertificate - Secure our app
Prerequisite
We have to make sure, we have
- Node.js installed in our local machine (To test the app locally)
We will deploy the code to Beanstalk manually. So we do not need the AWS CLI or Elastic Beanstalk (eb) CLI.
Run the Application in Local Machine
First, get the code from GitHub,
git clone https://github.com/socketio/chat-example.git
Go to the code repository,
cd chat-example
To install dependencies,
yarn
You may use npm instead of the yarn. In this case use npm i.
Run the app in local machine
yarn start
If you use npm, use npm start.
The server should be up and running on port 3000. Go to browser and open http://localhost:3000. This is a chat app and to verify functionalities, you may open these in two different browser windows and do messaging back and forth.
Deploy To Elastic Beanstalk
Before we go to aws console, we need to zip the source code for Elastic Beanstalk. It provides several options to deploy the code,
- CodePipeline
- S3
- Zip file
To make the source code zipped, we can go to the zip directory and do the zipping,
cd chat-example
zip -r chat-example.zip .
This will create a zip file named, chat-example.zip. You may manually zip the source files from the source folder.
Now go to https://aws.amazon.com and find the service Elastic Beanstalk. To create an application in Elastic Beanstalk we have to go through a couple of following steps,
- Click
Create application - As application name, we can use
chat-example - As platform choose
Node.js - As application code,
- Choose
Upload your code - As
Source code originselect theLocal file - Upload the
chat-example.zipfile we created in our local machine
- Choose
This might take several minutes. When the application is created, we will find the application URL at Go to Environment.
Test the app in two different browser windows.
Getting SSL Certificates
Before we get a certificate, we have to ensure, we have a Hosted Zone in Route 53 with a domain.
In my case, I already have a domain shams-nahid.com. I will put this application in chat-example.shams-nahid.com. So I will get the certificate for chat-example.shams-nahid.com.
So first, go the the Certificate Manager service. Request a public certificate and put the desired domain. In my case, it is chat-example.shams-nahid.com. Since my hosted zone is in AWS, DNS Validation will be faster. Confirm the request and add the DNS Resolution to the Route 53.
Click Complete and wait for validation to be completed. It may take 5-30 minutes.
Enable HTTPS
Now we have a running application in Elastic Beanstalk and also have a SSL certificate we can use.
We left two steps to use SSL in the Beanstalk have,
- Add the
Load Balancerto theElastic Beanstalk - Update
Route 53 Recordto point to theLoad Balancer
Add Load Balancer
To use HTTPS connection, we must make use of the Load Balancer. The Load Balancer will have a secure connection and it will route the traffic to Elastic Beanstalk.
In the Elastic Beanstalk select Environment -> Configuration -> Load Balancer settings.
Now add a listener with the following config,
- As
Portuse443(Default port for SSL) - As
ProtocaluseHTTPS - As
Certificateuse the newly created certificate - As
SSL Policyuse the latest one
Apply and wait for the application to be updated.
Go to
Elastic Beanstalkconfiguration forcapacityand make sure theEnvironment TypeisLoad Balanced.
Update Route 53 Records
Go to the Route 53 service hosted zone and add create a record,
- As record name
chat-example(Since, in my case URL arechat-example.shams-nahid.com) - Record type should be
A - Value should be
Alias- As alias use
Application and Classic Load Balancer - Put your region
- Select the
ALB URLfrom the dropdown
- As alias use
Now hit Create Record button and we are all set to go.
Go to the URL https://chat-example.shams-nahid.com and we should see the application is up and running.
You might chaek the videos on deploying app and secure connection
Please feel free to comment out any issues you are facing. I will assist accordingly.